Mastering the API Designer interface — every panel, every tool. Navigate the workspace confidently, write and validate RAML, enable mocking, and manage fragment dependencies.
In Chapter 4 we made our Mule application bulletproof with MUnit. Now we shift left — to the very beginning of the API lifecycle. Anypoint Design Center is where contracts are born, before a single Mule flow exists. This chapter is a deep tour of the tool itself: every panel, every button, every workflow. Chapter 5B then covers the professional architecture of the spec itself.
Register at anypoint.mulesoft.com/login/#/signup for a 30-day trial with full Design Center, Exchange, and 0.1 vCore on CloudHub. Every screenshot in this chapter was reproduced in a real trial account.
→ docs.mulesoft.com/design-centerBy the end of this chapter you will be able to:
- Navigate every panel of the API Designer interface — both Code view and Visual view
- Create a project in Design Center from scratch
- Use the file explorer, the outline panel, and the documentation preview confidently
- Enable the Mocking Service and call your mock with curl
- Add fragment dependencies from Anypoint Exchange
- Choose between Code view and Visual view depending on the task
- Understand the role of API Governance (2025 update)
01 · Why First — Design Before You Code
Traditional integration starts by writing Mule flows, then hoping the endpoints satisfy consumers. API-first inverts this: publish a contract first, get sign-off from stakeholders, and let front-end teams work against a mock — all before any back-end logic exists.
Backend-first delivery
Build the flow, then hope the contract matches. Frontend teams sit idle. Surprises surface at integration time.
- Backend builds in isolation
- Frontend blocked on real endpoints
- Integration surprises late in the cycle
- Rework and missed deadlines
Contract before code
Design the spec, publish a mock, parallelise teams. Backend and frontend work simultaneously against the same contract.
- Design spec → review → sign-off
- Enable mock — frontend unblocks instantly
- Backend implements against the same RAML
- Integration surprises eliminated
On a 6-week API project, API-first typically saves 2–3 weeks of calendar time. The frontend team doesn’t wait — they build against the mock service, file PRs against contract-violating assumptions, and the spec evolves with feedback before backend code is written. By the time the Mule flow is ready, the frontend is already wired and tested.
02 · Access — Getting Into Design Center
Design Center runs entirely in the browser. No local installation is needed. Three ways to land in it:
- Go to
anypoint.mulesoft.comand log in - Click the 9-dot grid icon (top-left) → Design Center
- Or use the direct URL:
anypoint.mulesoft.com/designcenter
You land on the Design Center home listing all your API spec and fragment projects. Click + Create new → New API Specification, choose a name and either RAML 1.0 or OAS 3.0, then click Create.
Register at anypoint.mulesoft.com/login/#/signup. You get 30 days with full Design Center, Exchange, and 0.1 vCore on CloudHub — enough to follow every chapter of this series end-to-end.
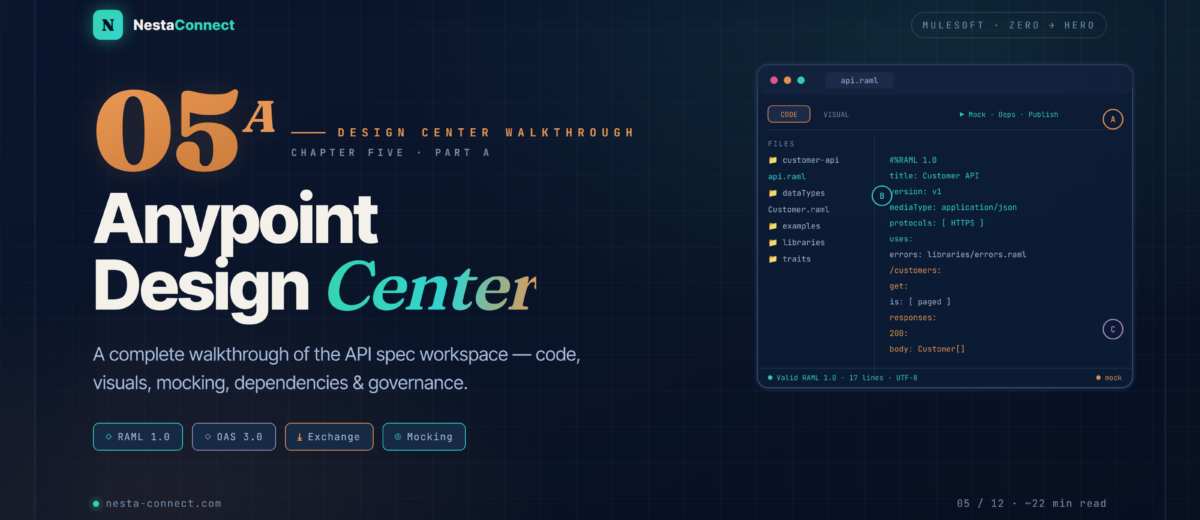
03 · Code View — The Five Zones of the Code Editor
When you open a project in Design Center, the default view is the Code Editor. This is where the real RAML or OAS lives. The interface has five distinct zones, as shown in the annotated mockup below — modelled on the actual Design Center UI.
| # | Zone | What it does |
|---|---|---|
| A | File Explorer | Shows the full project tree: docs/, examples/, types/, exchange_modules/. The Root file badge marks the entry point. Click + to add files. Three-dot menu on any file for rename/delete. |
| B | Code Editor (dark) | Monaco-based editor with full RAML/OAS syntax highlighting. Real-time validation (red underlines on error). Ctrl+Space triggers autocomplete. !include paths shown as clickable links. Auto-saves every few seconds. |
| C | Outline / Navigation | Bottom-of-editor strip. Jump to any section: Types and Traits, Root, Parameters, Docs, Security. Changes colour (orange/red) when there are validation errors in that section. |
| D | Documentation Preview | Right panel — live rendering of your API documentation. Title, version, protocols, and all endpoints as clickable pills. The 🛡 shield opens Governance; the ⚡ bolt opens Mock settings. |
| E | Status Bar | Current file, cursor position, file type. The 🟡 Project Errors indicator expands to show all validation issues. Governance auto-validation: on means your org’s rulesets are actively checked on every save. |
04 · Visual — The Visual Editor (UI View)
For developers — or stakeholders — who prefer a form-based interface, Design Center also offers a Visual Editor accessible from the left panel when creating a new spec. This is especially useful for onboarding business analysts or team members unfamiliar with RAML syntax. The visual editor generates valid RAML behind the scenes, visible in the Edit RAML panel on the right.
| # | Zone | What it does |
|---|---|---|
| 1 | Left Nav (Visual) | Sections for Security Schemes, Resources, Data Types, Groups. Click + to add new items. Each section expands to show existing entries. Import from Exchange pulls published fragment types directly into your spec. |
| 2 | API Summary form | The main editing area. Fill in Title, Version, Protocols, Media type, Base URI, Description, Secured By. Click any Resource to see its own form with methods, query parameters, headers, response codes. No RAML knowledge required. |
| 3 | Live RAML preview | Every form change instantly generates RAML, visible in this right panel. Click Edit RAML to switch to the code view at any point — changes are bidirectional. Download exports the .raml file. |
| 4 | RAML / OAS switch | Bottom-right toggle. Switch between RAML 1.0 and OAS 3.0 preview at any time. Design Center can convert the spec between the two formats from this switcher. |
Use the Visual Editor for the initial API Summary (title, version, base URI, protocols) and for adding Resources and Data Types when demoing to non-technical stakeholders. Switch to the Code Editor for everything else — traits, security schemes, !include references, and any advanced RAML features. The two views are always in sync.
05 · Mocking — Enable, Configure & Call Your Mock
Once at least one resource has a response with an example, you can enable the Mocking Service. Click the ⚡ icon in the top-right of the Documentation panel — this opens the Mocking Service Configuration panel.
The Mocking Service Configuration panel has two sections:
- Service Settings → Make Public: When OFF (default), calls to the mock URL require an
Authorizationheader (any non-empty value works). When ON, the mock is accessible without any auth header — useful for sharing with external stakeholders. - Local Settings → Select By Default: When ON, the Documentation panel’s “Try it” feature pre-selects the mock URL instead of prompting users to enter one manually.
5.1 Calling Your Mock
Three real curl scenarios — copy and run against any RAML spec with example responses defined:
# Default (Make Public = OFF) — any Authorization value works
curl -H "Authorization: anything" \
  https://anypoint.mulesoft.com/mocking/api/v1/links/<mock-id>/customers

# Force a specific HTTP status code in the response
curl -H "Authorization: anything" \
     -H "X-Response-Status: 404" \
  https://anypoint.mulesoft.com/mocking/api/v1/links/<mock-id>/customers/99

# Make Public = ON — no auth header needed
curl https://anypoint.mulesoft.com/mocking/api/v1/links/<mock-id>/customers

# Force a content-type variant (if multiple defined in the spec)
curl -H "Authorization: anything" \
     -H "Accept: application/xml" \
  https://anypoint.mulesoft.com/mocking/api/v1/links/<mock-id>/customers
The Mocking Service returns whatever example blocks you define in the RAML spec. Skimpy examples produce useless mocks. Provide realistic, varied example payloads — different IDs, different states, edge cases. Frontend developers will build their UI assuming your mock data shape is canonical.
06 · Dependencies — Fragments from Exchange
The third left-sidebar icon (⊕) opens the Dependencies panel. This is where you add published RAML fragments or API Governance rulesets to your spec — the foundation of reuse across teams.
In the Dependencies panel, click + next to Fragments → a search dialog opens → type the fragment name (e.g. shared-api-library) → select the version → click Add. Design Center immediately downloads it into exchange_modules/ and you can reference it in your spec with uses: Lib: exchange_modules/.... The full path is shown in the file tree.
exchange_modules/ manuallyThis folder is managed entirely by Design Center. Treat it like node_modules/. Any manual edits are silently overwritten on the next sync, and Git diffs become unreadable. If you need to fork a fragment, do it properly — clone the source project, publish a new fragment, swap the dependency.
07 · RAML vs OAS — Choosing Your Spec Language
Design Center lets you switch between RAML and OAS from the bottom-right tab of the Visual Editor. Both are fully supported. The decision is rarely technical — it’s organisational.
| Capability | RAML 1.0 | OAS 3.0 (YAML) |
|---|---|---|
| MuleSoft native support | 🟢 Deep — APIKit, Exchange, API Console | 🟡 Supported, less native |
| Fragment / modular reuse | !include — first-class, files or Exchange | $ref — external files only |
| Traits (method mixins) | 🟢 Built-in traits: key | 🔴 Not native (manual duplication) |
| Resource types | 🟢 Built-in resourceTypes: | 🔴 Not supported |
| Industry tooling (Postman, Stoplight, Swagger UI) | 🟡 MuleSoft-centric | 🟢 Very broad |
| Governance ruleset support | 🟢 Full | 🟢 Full |
| Recommended for | MuleSoft-native teams | Multi-platform / open ecosystem |
If your organisation is committed to the Anypoint Platform end-to-end, choose RAML — you’ll get traits, resource types, and tighter APIKit integration. If you publish APIs to external partners, mix Mule with other gateways, or use tools like Stoplight/Postman heavily, choose OAS 3.0. Don’t waste cycles debating: the spec is the contract, not the tribe.
08 · Recap — Chapter Summary
Five-zone interface
The Monaco-based editor is where the real spec lives — auto-validated, auto-saved.
- File Explorer · root file badge
- Code Editor ·
!includeautocomplete - Outline strip · jump by section
- Doc preview · 🛡 + ⚡ controls
Form-based for onboarding
Four zones · generates valid RAML behind the scenes · bidirectional sync with code view.
- Left nav for Security / Resources / Types
- API Summary form
- Live
Edit RAMLpreview - RAML ↔ OAS tab switch
One spec, three teams
Enable from the ⚡ button. Toggle Make Public. Use X-Response-Status to force codes.
- Frontend unblocked immediately
- Partners / QA build collections early
- Backend implements same contract
- Saves 2–3 weeks on a 6-week project
Fragments from Exchange
One click adds a versioned asset · auto-downloaded to exchange_modules/ · never edit manually.
- Library fragments centralise reuse
- Versions pinned semver-style
- Rulesets validate on save (2025)
- Treat folder like
node_modules/
Org-wide design standards
Auto-validation: on. Org rulesets enforce naming, security, mandatory headers — at save time.
- Violations as 🟡 Project Errors
- Specific line numbers + rule names
- Non-conforming specs can be blocked
- 2025 feature · Exchange-integrated
Two separate verbs
Publish (top-right) pushes to Exchange for discovery. Deploy happens later in Runtime Manager.
- Publish → Exchange + Governance
- Deploy → CloudHub / Runtime Fabric
- Independent steps · independent permissions
- Publish often · deploy carefully
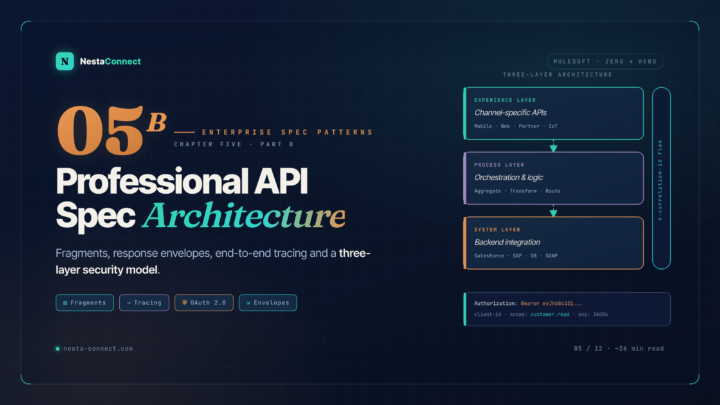
Now that you know the tool, Chapter 5B takes you into the architecture of a production-grade spec: folder structure, fragment libraries, the standard API response envelope, end-to-end tracing with x-correlation-id, and a 3-layer security model. Specs that scale, not specs that just compile.